
Preparing for dermal fillers in Sacramento involves a few essential steps to enhance your experience. First, understanding what dermal fillers are will help set realistic expectations; they are gel-like substances used to restore facial volume and smoothen lines. A pre-treatment consultation is crucial to assess your goals and medical history, ensuring you choose the right filler type. Before the treatment, avoid blood thinners like aspirin for about a week to minimize bruising, and limit alcohol intake a couple of days prior. Staying hydrated helps improve outcomes as well. On the treatment day, arrive with a clean face and follow post-care tips for best results.
1. Understanding Dermal Fillers
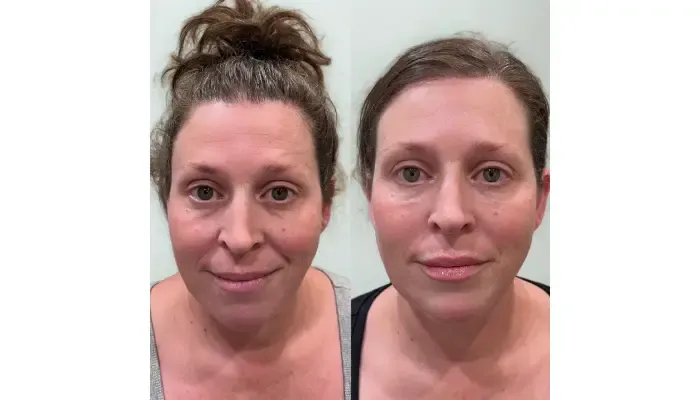
A dermal filler in Sacramento is an injectable substance designed to enhance facial features and restore volume that can diminish with age. They can be applied in various areas of the face, including the cheeks, lips, and under-eye hollows, providing a rejuvenated appearance. The results from dermal fillers generally last between 6 months to 2 years, influenced by the type of filler chosen. As a minimally invasive procedure, it usually requires little downtime, making it an appealing option for many. Consulting with a trained professional is essential to identify the best filler for your unique needs, as each type has distinct properties for achieving different effects, such as lift or volume. For example, hyaluronic acid fillers attract moisture to the skin, enhancing hydration and fullness. Additionally, fillers can be utilized for non-surgical nose jobs or enhancing the jawline. Understanding potential results helps set realistic expectations and ensures that the treatment aligns with your desired outcomes. Being knowledgeable about the ingredients in fillers can empower you to make informed choices during your treatment.

2. Pre-Treatment Consultation
A pre-treatment consultation is a key step in preparing for dermal filler injections. During this meeting, the injector evaluates your facial symmetry and skin quality, which helps in tailoring the treatment to your specific needs. Discussing your goals is vital, as it allows the injector to customize a plan that aligns with your expectations. Visual aids might be used to illustrate potential outcomes and demonstrate various techniques, making the process clearer and more engaging.
It’s also important for patients to feel comfortable asking questions about the procedure and recovery, as open communication fosters trust. Reviewing any past cosmetic procedures can provide insights into how your body may respond to fillers. Additionally, discussing lifestyle factors, such as smoking or sun exposure, is crucial since these can significantly impact healing.
Understanding the injector’s qualifications and experience is essential for ensuring safety during the procedure. A skin evaluation may also be conducted to confirm that you are a suitable candidate for treatment. This comprehensive approach helps to set realistic expectations and enhances your overall comfort with the process.
3. Preparation Steps
Before your dermal filler appointment, there are several important steps to follow that can help ensure a smooth experience. First, gather any necessary medical records or information that may be required during your consultation. This allows your provider to make informed decisions about your treatment. Additionally, consider scheduling the procedure at a time when you can rest afterward, as this will help you recover more comfortably.
It’s also wise to avoid intense physical activities or heat exposure leading up to the treatment. This includes avoiding hot yoga or long sun exposure, as such activities can increase swelling. If you are prone to cold sores, make sure to discuss preventative measures with your provider, as this can help you avoid complications.
Documentation of any previous reactions to fillers or anesthesia is essential, as this information can guide your injector in choosing the best approach for you. Some clients find that taking arnica supplements before the treatment may help reduce bruising, so consider this option as well.
Follow any specific skincare instructions given by your injector. This might include avoiding certain products or treatments 48 hours prior to your appointment. It’s also important to have a support person available to assist you after the procedure if needed, especially if you experience any discomfort.
Review your daily medications and supplements with your provider to ensure that they are safe to continue before treatment. Lastly, establish a plan for aftercare, including what supplies you may need, such as cold compresses or any prescribed topical treatments.
4. Day of Treatment
On the day of your treatment, arriving on time is essential. It helps reduce stress and creates a calm environment for both you and the injector. Before the procedure begins, take a moment to discuss any last-minute concerns or questions you may have. It’s important to feel comfortable and informed. The treatment area will be thoroughly cleaned to minimize the risk of infection, ensuring a safe experience. During the injections, the filler is typically administered in small amounts for precision, which allows for better control over the results. You might feel a slight pinch or pressure during the injections, but many fillers contain lidocaine to help numb the area.
After the treatment, your injector may schedule a follow-up appointment to assess the results and ensure everything is healing properly. It’s advisable to avoid strenuous activities for the remainder of the day, allowing your body to adjust to the filler. You will receive detailed post-treatment instructions both verbally and in writing, so make sure to keep them handy. If you experience any immediate reactions, report them to your injector right away. Finally, keep in mind that results may vary initially as your body adjusts, so managing your expectations is key.
5. Timing Considerations
Timing is crucial when planning for dermal fillers. It’s wise to schedule your appointment at least 1-2 weeks before any important events, like weddings or parties, to allow any swelling or bruising to fade. The initial swelling typically lasts 2-3 days, but the full effects of the treatment may take up to two weeks to appear, so patience is key. Seasonal factors can also play a role; for example, hot weather may increase swelling, while cold weather can help minimize it.
Consulting with your injector can provide valuable insights into the best times for touch-ups, especially if you want to maintain results leading up to special occasions. It’s important to remember that some fillers may require maintenance sooner than others, so discussing your long-term goals can help determine the right timing for repeat treatments.
Additionally, avoid scheduling your treatment during high-stress periods, as stress can negatively impact healing and results. If you have upcoming vacations or travel plans, consider these when planning your treatment, as you’ll want enough time for recovery. Finally, be prepared for potential unexpected reactions by allowing some flexibility in your schedule.
6. Potential Side Effects
Common side effects of dermal fillers include swelling, bruising, redness, and tenderness around the injection sites. These reactions are typically mild and resolve within a few days. Uncommon side effects may involve lumps or migration of the filler, which can be concerning. It’s important to know how to manage these side effects to ensure comfort during your recovery. Patients should also be informed about the signs of an allergic reaction or infection, as prompt recognition can prevent complications.
While rare, vascular occlusion is a serious complication that requires immediate medical attention. Discussing potential side effects during your consultation helps set realistic expectations for the treatment. To minimize risks, it’s advised to avoid dental work for a few weeks after receiving fillers. Keeping a record of any side effects can assist in planning future treatments. If you notice unusual symptoms, reacting quickly is crucial for achieving the best outcomes.
- Common side effects include swelling, bruising, or redness at the injection sites.
- Uncommon side effects may include lumps or migration of the filler.
- Understanding how to manage side effects can enhance comfort during recovery.
- Patients should be informed of the signs of an allergic reaction or infection.
- While rare, vascular occlusion is a serious complication that requires immediate attention.
- Discussing potential side effects helps in setting realistic expectations.
- It is advised to avoid dental work for a few weeks post-treatment to minimize risks.
- Side effects typically resolve within a few days, but some may last longer depending on the individual.
- Keeping a record of side effects can help in future treatment planning.
- Reacting quickly to unusual symptoms is advisable for the best outcomes.
7. Benefits of Proper Preparation
Proper preparation for dermal fillers can greatly enhance your experience and results. Being informed and ready can lead to more satisfying treatment outcomes and help reduce anxiety. When you know what to expect, the treatment process tends to go smoothly, which can minimize complications. Patients who prepare well often report less discomfort after the procedure, allowing for a more pleasant recovery. Additionally, proper preparation aids in achieving a natural-looking result that aligns with your aesthetic goals. Understanding the process fosters trust in your provider, which is crucial for a successful treatment experience. By following preparation guidelines, you can also reduce downtime, leading to a quicker recovery. This proactive approach often results in fewer side effects and complications, contributing to overall satisfaction with the treatment. Ultimately, being prepared empowers you throughout your cosmetic journey, making it a more enjoyable experience.
Frequently Asked Questions
What should I do before getting dermal fillers in Sacramento?
Before getting dermal fillers, it’s important to avoid alcohol, and blood thinners like aspirin, for about a week. Also, take time to consult with your provider about your goals.
Are there any specific health conditions that may affect my treatment?
Yes, if you have conditions like allergies, skin infections, or certain autoimmune diseases, it might be wise to discuss these with your provider beforehand.
Can I wear makeup on the day of my dermal filler appointment?
It’s best to avoid wearing makeup to your appointment, so the provider can clearly see your skin and any problem areas, ensuring the best possible results.
How long does it take for the fillers to settle after the procedure?
Typically, fillers can take about one to two weeks to fully settle, which allows for any swelling or bruising to go down.
What aftercare tips should I follow following my treatment?
After getting dermal fillers, avoid strenuous exercise, excessive sun exposure, and touching the treated areas for at least 24 hours to help with healing.
TL;DR Preparing for dermal fillers in Sacramento involves understanding the treatment, engaging in a thorough consultation, and following specific pre-treatment guidelines. Key steps include avoiding blood thinners, limiting alcohol and caffeine, staying hydrated, and being mindful of skincare products. On the day of treatment, arrive with a clean face, and after the procedure, care for the treated area properly. Scheduling the appointment wisely is crucial, ideally 1-2 weeks before significant events. Familiarizing yourself with potential side effects and the benefits of proper preparation can enhance your overall experience and results.

